

Finally! In the first 2 parts of this tutorial series we focused on training models on Azure’s Custom Vision platform to perform recognition on Vexcel imagery. But now the best part; We’ll use the REST API exposed by Custom Vision to handle the repetitive task of running multiple properties through the model. This opens up use cases like analyzing a bunch of property records after a tornado or wildfire using Vexcel graysky imagery. Or checking to see which homes have a swimming pool using Vexcel Blue sky imagery.
In this tutorial we’ll use c# to call the Vexcel API and Custom Vision API, but you should be able to adapt this to any language or environment of your choosing. The application will make a call to the Vexcel platform to get an auth token, subsequent calls to generate an ortho image of a given property, then pass that image to our model on Custom Vision for recognition. Once you have this working, its easy to take it to the next step to open a CSV file containing a list of locations, and perform these steps for each record..
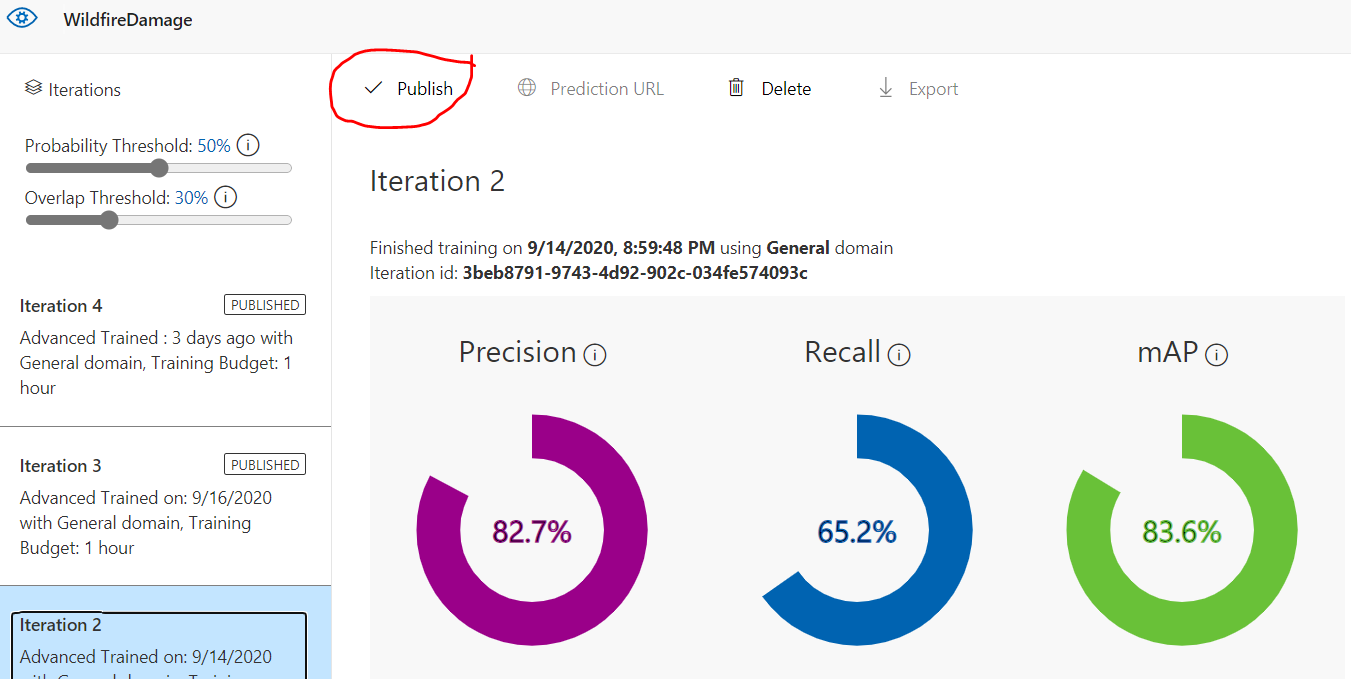
Step 1: Publish your model
In the previous tutorials we trained a model to recognize objects or damage in aerial imagery. We can now make programmatic calls to the model using the Custom Vision API, but first we need to publish the trained iteration, making it accessible by the API.
This is easy to do. In the Custom vision Dashboard, go to the Performance tab, select your iteration, and hit the ‘publish’ button as highlighted here.
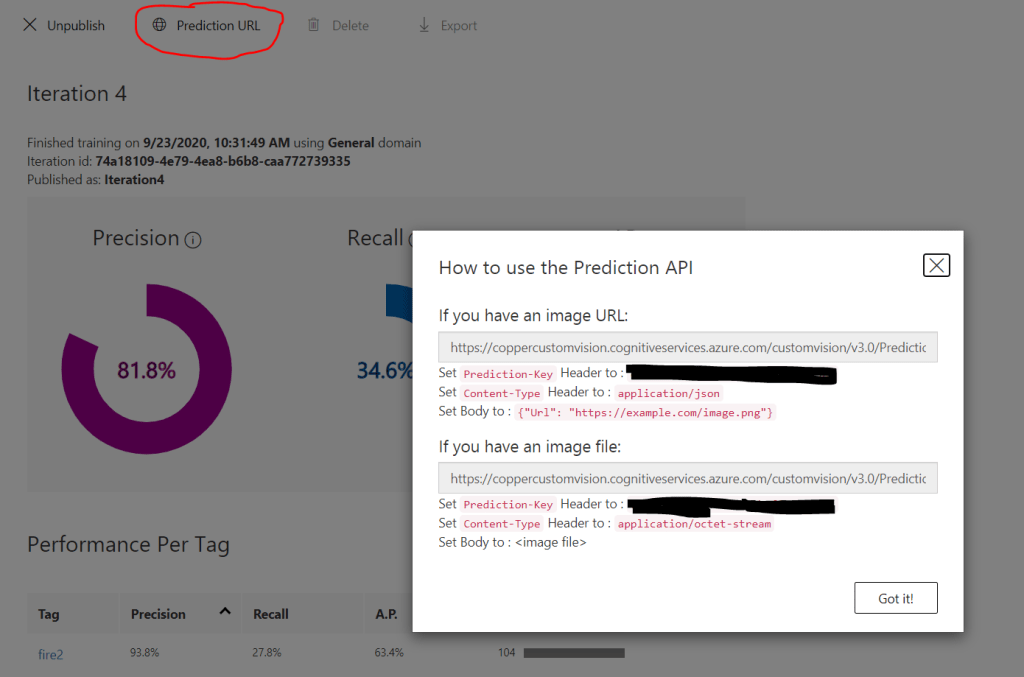
Once the publish is complete, the ‘Prediction URL’ link will become active. Click it to view the parameters for your model that you will need when making calls with the API. The ‘Iteration ID’ is shown on the main dashboard page. The prediction key is visible in the dialog that pops up, as well as the REST URL which will contain the project ID. Take note of all of these values. We’ll use them in a moment.
Step 2: Generate an Authentication token with the Vexcel API
Each API call to the Vexcel platform requires and auth token to be passed. When your app starts up, you can call the login service to generate one and use it for all subsequent calls. An auth token is good for up to 12 hours.
string VexcelToken = "";

try
{
    string userid = "yourUserID";
    string pw = "yourPW";
    string authURL = "https://api.gic.org/auth/Login?username=" + userid + "&password=" + pw;

    string jsonResponse = FetchWebURL(authURL);
    dynamic dynObj = JsonConvert.DeserializeObject(jsonResponse);
    VexcelToken = dynObj.token;
}
catch (HttpRequestException e)
The fetchURL() method is used to make an HTTP request and return the response as a string. Here is a simple implementation for C#.
string html = "";
try
{
    WebRequest request = WebRequest.Create(url);
    WebResponse response = request.GetResponse();
    Stream data = response.GetResponseStream();

    using (StreamReader sr = new StreamReader(data))
    {
        html = sr.ReadToEnd();
    }
}
catch (Exception ex)
{
     //handle the error here
}
return html;
Step 3: Generate a URL to request an image of a property
There’s generally two steps to request an image from the Vexcel library; first query the catalog to see what is available, then request the appropriate image. Lets do exactly that for this coordinate damaged in the Oregon wild fires recently: 45.014910, -123.93089
We’ll start with a call to FindImages(). This service will return a JSON response telling us about the best image that matches our query parameters. Those parameters include the coordinate, a list of layers to query against, and the orientation of the image we want returned. For the layer list we are passing in Vexcel’s two gray sky layers; we want the best (most recent) image across any catastrophe response layer. We’ll set orientation to Nadir as we want a traditional vertical image, but you can also query for Vexcel’s oblique imagery with this parameter.
string layers = "graysky,graysky-g";
double latitude = 45.014910;
double longitude = -123.93089;
string metadataURL = "https://api.gic.org/metadata/FindImage?layer=" + layers +
    "&format=json&EPSG=4326&orientation=" + "NADIR" +
    "&xcoordinate=" + longitude + "&ycoordinate=" + latitude + "&AuthToken=" + vexcelAuthToken;

string jsonString = FetchWebURL(metadataURL);
In the Json response, we’ll have all of the information we need to request a snippet of imagery with the ExtractImages() method. This workhorse provides you access to all of the pixels that make up the Vexcel library, one snippet at a time carved up to your exact specification. As you can see below in the code, the first bit of metadata that we’ll grab is the date the image was taken. This is one of the most important pieces of metadata regardless of what kind of application you are building; you’ll always want to know the date of the image being used. And then most importantly, we’ll form a URL to the ExtractImages endpoint with all of the parameters needed to get the image we need, as provided by the FindImage() call above.
try  {
    dynamic dynObj = JsonConvert.DeserializeObject(jsonString);

    string imageDate = dynObj.capture_date;

    string imageURL = "https://api.gic.org/images/ExtractImages/" + dynObj.layername +
            "?mode=one&orientation=NADIR&logo=yes&imagename=" + dynObj.image_id +
            "&EPSG=4326&xcoordinate=" + longitude + "&ycoordinate=" + latitude +
            "&nadirRotatedNorth=yes" +
            "&imagename=" + dynObj.image_id +
            "&zoom=0&width=" + 800 + "&height=" + 800 + "&AuthToken=" + vexcelAuthToken;
}
the imageURL will be similar to this:
and will return an image that looks like this:

Step 4: Pass the image to Custom vision for analysis
Its finally time to pass the Image snippet to Custom Vision for recognition. You’ll need the details from step 1 above where you published your model. You can return to the Custom Vision dashboard to get them. Here is the c# to make the API call and get back a JSON response indicating what tags were found in the image.
string grayPredictionURL = "https://coppercustomvision.cognitiveservices.azure.com/customvision/v1.1/Prediction/8209f23b-e9f5-4a6e-8664-910425d5aa55/url?iterationId=74a18109-4e79-4ea8-b6b8-caa772739335"
string predictionKeyHeader = "Your prediction key"; //from the custom vision dialog box

try
{
    imageURL = "{ \"Url\": \"" + imageURL + "\" }";

    HttpWebRequest request = (HttpWebRequest)WebRequest.Create(grayPredictionURL);
    request.Headers.Add("Prediction-Key", predictionKeyHeader);
    request.ContentType = "application/json";
    request.Host = "coppercustomvision.cognitiveservices.azure.com";

    var sendData = Encoding.ASCII.GetBytes(imageURL);
    request.Method = "POST";
    request.ContentType = "application/json";
    request.ContentLength = sendData.Length;

    var newStream = request.GetRequestStream();
    newStream.Write(sendData, 0, sendData.Length);
    newStream.Close();

    WebResponse response = request.GetResponse();
    Stream data = response.GetResponseStream();
    using (StreamReader sr = new StreamReader(data))
    {
         string jsonString = sr.ReadToEnd();
    }
}
The last bit of code is to parse the returned JSON to find the tags discovered in the image. Keep in mind that there can be multiple tags each with their own probability score returned. We’ll keep it simple and loop through each tag looking for the highest probability, but in your implementation you could choose to be more precise than this, perhaps by considering the position of each discovered tag relative to the center of the image.
try
{
    dynamic dynObj = JsonConvert.DeserializeObject(jsonString);
    int predictionCount = dynObj.Predictions.Count;

    double highestDamageProbability = 0;
    string highestDamageTag = "";

    for (int indx = 0; indx < predictionCount; indx++)
    {
        string tagName = dynObj.Predictions[indx].Tag;

        string tmp = dynObj.Predictions[indx].Probability;
        double thisProb = double.Parse(tmp);
        thisProb = Math.Round(thisProb, 3);

        if (thisProb > highestDamageProbability)
        {
            highestDamageProbability = thisProb;
            highestDamageTag = tagName;
        }
    }
    roofDamageLevel = highestDamageTag + " (score: " + highestDamageProbability + ")";
}
That’s it! Now that you can programmatically analyze a single image, its a small step to put a loop together to step through a large table of properties. In a future tutorial here on the Groundtruth, we’ll do something similar building on the code above to create a highly useful application.
