

At Vexcel, we collect and process our aerial imagery with an eye towards much more than just traditional visual inspection scenarios. Our Ultracam line of camera systems are engineered from the ground up (punny!) with precise photogrammetry and computer vision applications in mind. Until recently it took a room full of data scientists and lot’s of custom application development to tap into the power of AI analysis over imagery, but today off the shelf tools on Amazon’s AWS platform and Microsoft’s Azure have democratized this technology making it available and easy to use by anyone.
In this multipart tutorial we’ll look at how easy it is to use aerial imagery in your own computer vision systems built on Azure’s Custom Vision platform. Custom Vision provides a web application for image tagging and training your model, as well as a simple REST api to integrate your model into any kind of application. And it couldn’t be easier! You’ll have your first computer vision system working end to end in just a few hours with part one of this tutorial. Stick around for all three parts and this is what we’ll cover
- Part 1. Train a model that works with Vexcel’s Blue Sky Ultra-high resolution imagery to detect solar panels on Rooftops.
- Part 2. Train a model utilizing Vexcel Gray Sky (disaster response) imagery to detect Fire damage after wildfires. Or you could choose to focus on Wind Damage after a tornado or hurricane.
- Part 3. Classify gray sky images using the Custom Vision REST api. We’ll build an app to iterate through a list of properties from a CSV file, classify each one based on the wind damage level, and save the results to a KML file for display in any mapping application
Part 1: Solar Panel detection in Blue Sky Imagery
This tutorial will show you how to Utilize GIC Aerial Imagery to detect objects like solar panels or swimming pools using AI. We’ll build a system to detect the presence of solar panels on a roof, but you can easily customize to add other objects you would like to detect.
We’ll be using Microsoft’s Custom Vision service, which runs on the Azure platform. If you already have an Azure account, you can use it in this tutorial. If not, we’ll look at how to create one along the way. Keep in mind that although there is no charge to get started with Azure and Custom Vision, during Azure signup a credit card is required.
At the end of this section of the tutorial, you’ll have a trained model in the cloud that you can programmatically pass an image to and get back a JSON response indicating if a Solar panel was found in the image along with the probability score.
Step 1: Create a Custom Vision Account
To get started visit this URL: https://www.customvision.ai/
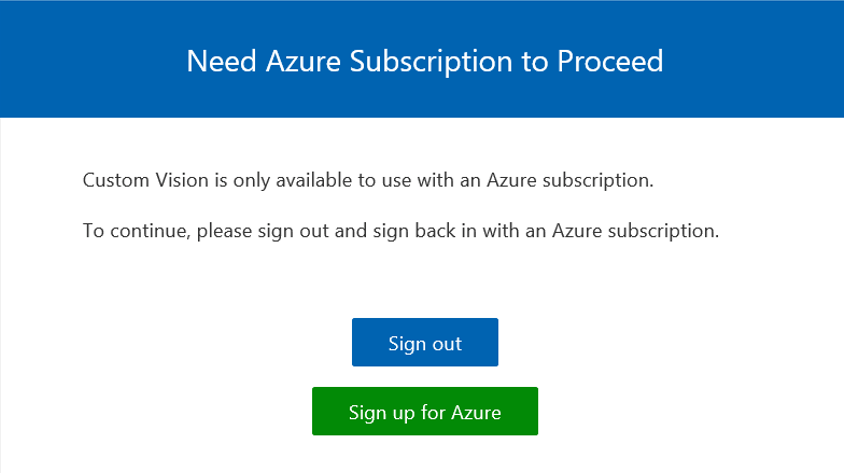
Hit the ‘Sign in’ button. You can then either sign in with an existing Microsoft account, or create a new one. If you sign in with a Microsoft account already connected to Azure, you won’t need to create an Azure account.
If there isn’t an Azure subscription attached to the Microsoft account you are using, you’ll see a dialog like the one shown here. Click ‘sign up for azure’ and follow the steps to create your azure account.
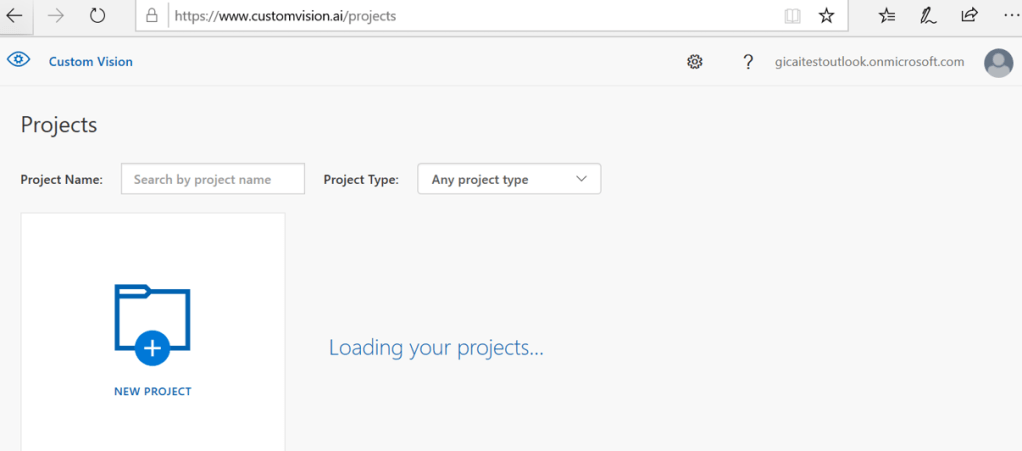
When you are done, return to https://www.customvision.ai/
You should see something like the image shown here. Great! You got all of the account creation housekeeping out of the way, now on to the fun stuff!
Step 2: Collect a bunch of images showing solar panels
In this step, we’ll collect images pulled from the Vexcel image library that feature homes with solar panels on the roof. These images will be used in step 3 to train the AI model.
TIP: You need a minimum of 15 images to get started. More images will yield better results, but you can start with 15 and add more later if you like. As you collect them, try to pull a sample from different geographic regions. Rooftops in Phoenix are very different than those in Boston; try to provide diversity in your source images to ensure that the resulting model will work well in different regions.
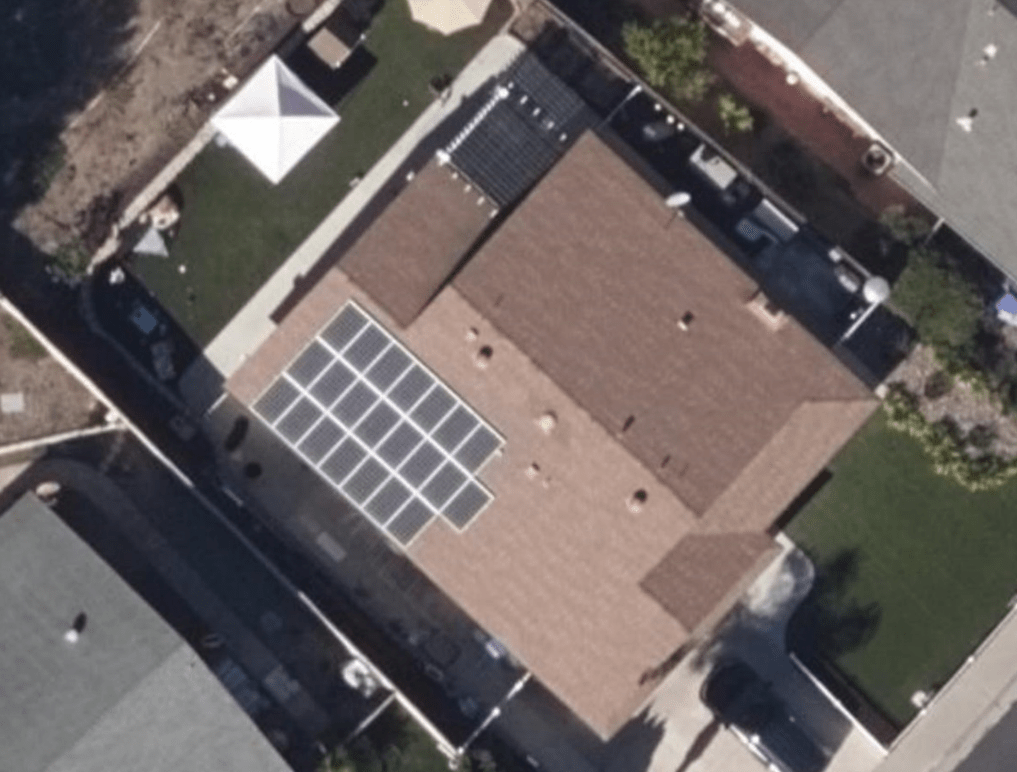
Create a folder on your local PC to save these images too. There are several ways you can create your images of rooftops with Solar panels. One easy way is to use the GIC web application, browse the library looking for solar panels, then take a screen grab and save it to your new folder.
Here is an address to try this on: 11380 Florindo Rd, San Diego, CA 92127
Use a screen clipping tool to grab an image and save it to your folder. It should look something like this:
When you have 15 or more good examples of rooftops with solar panels in your folder, move on to the next step. Its time to tag our images!
Step 3: Create a new project in your Custom vision account
Return to your Custom vision account at https://www.customvision.ai/
Click the ‘New project’ button and fill in the form like this:
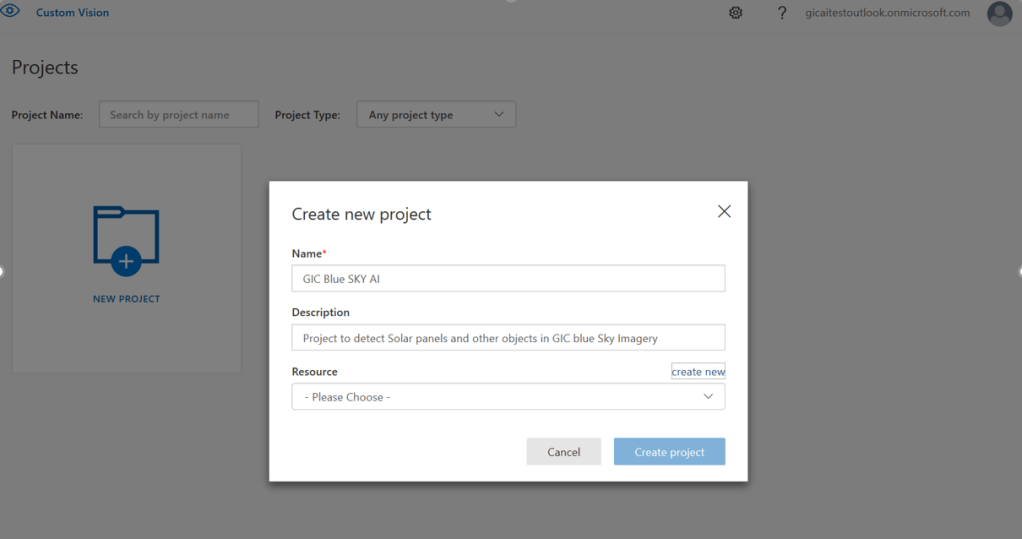
For Resource, hit the ‘Create new’ link.
Your ‘New project’ form will ultimately look something like this:
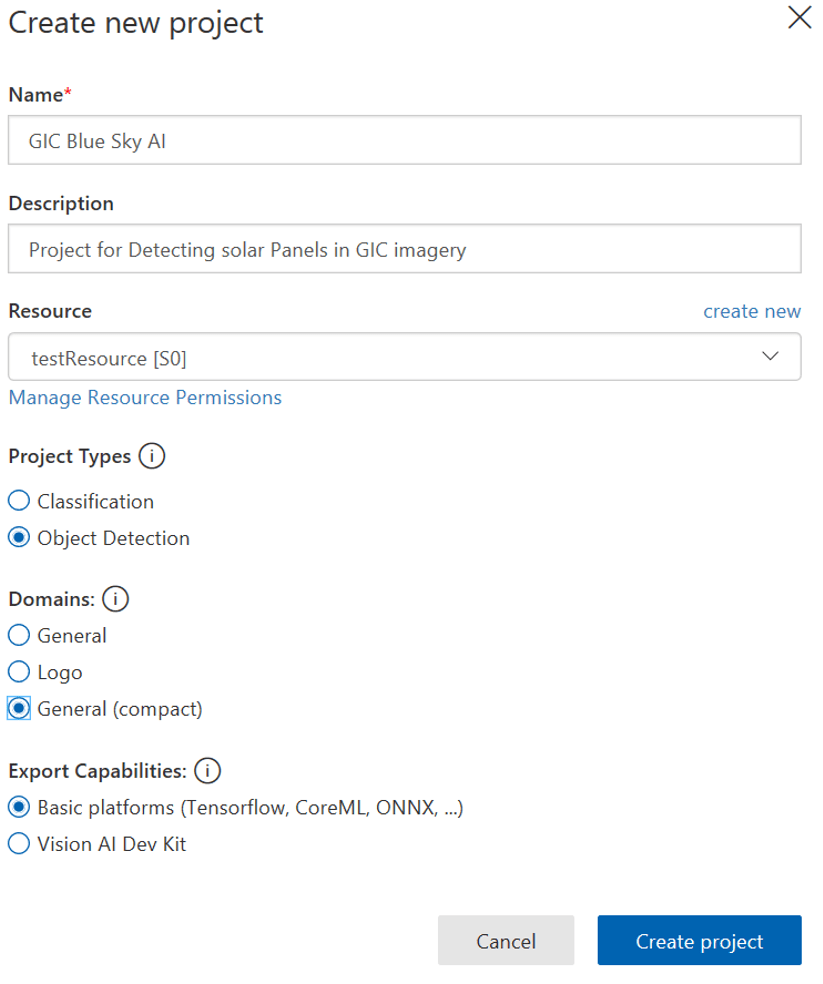
Hit the ‘Create project’ button to complete the creation process. You now have a new empty project. In the next step we’ll import the images we created previously and tag them.
Step 4: Upload and Tag these images.
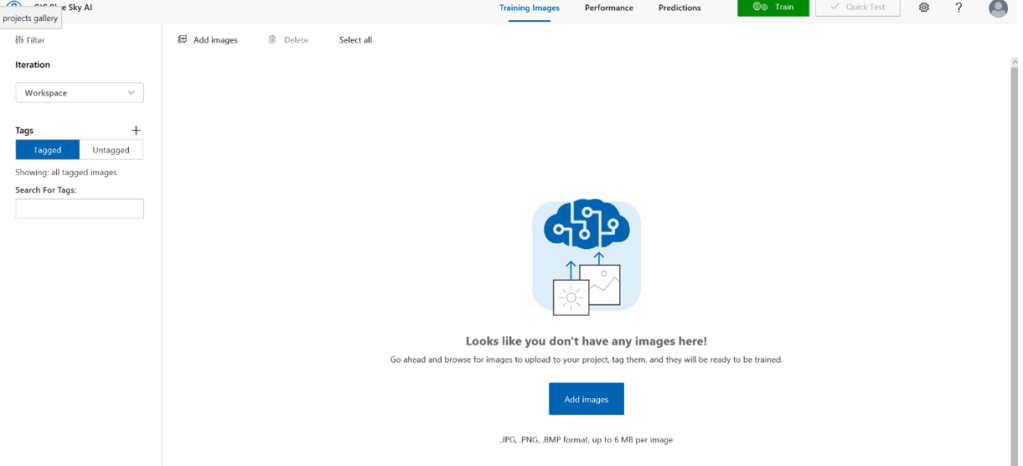
Your new empty project should look something like this:
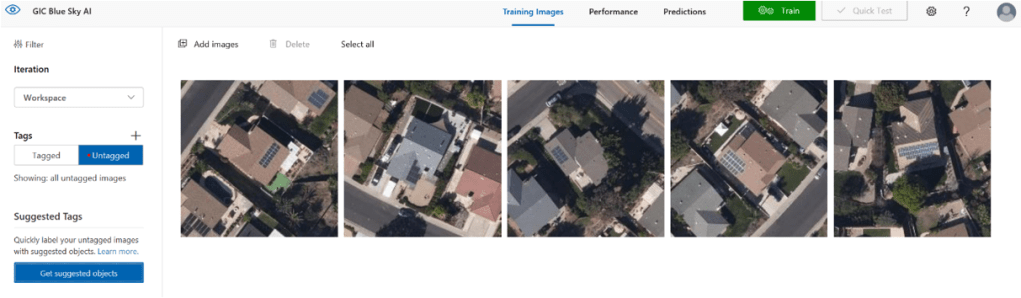
Hit the ‘Add Images’ button and import all of the images you saved earlier. You should see all of your untagged images in the interface like this:
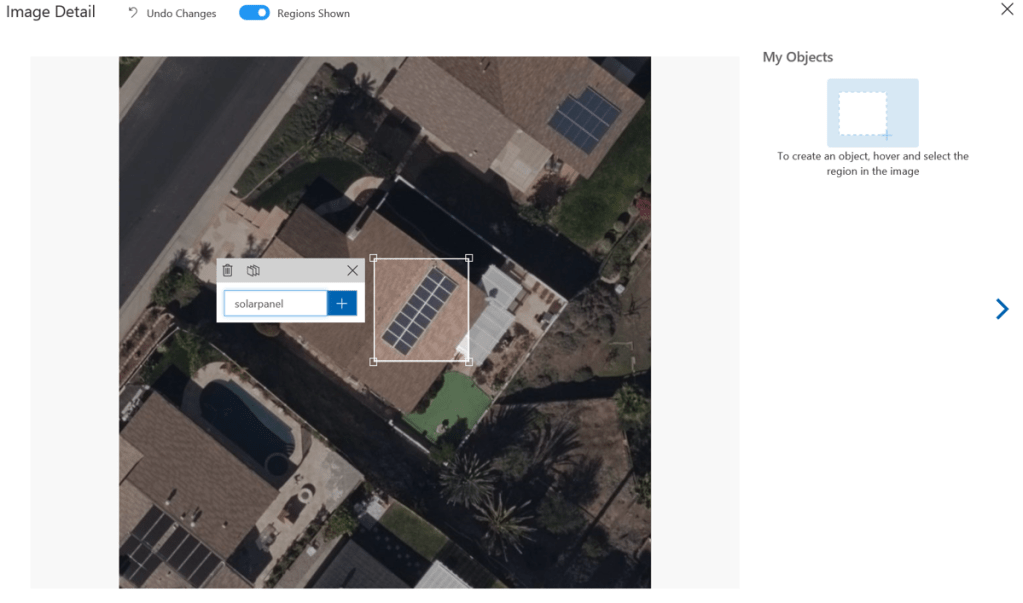
Click on the first one to begin the tagging process. Drag a box around the area of the image with solar panels, enter a new tag name of ‘solarpanel’ and hit enter.
You’ve tagged your first solar panel! Continue tagging each of the remaining images, one at a time until you have no untagged images remaining.
Step 5: Train the model
If you click the ‘tagged’ button as highlighted below, you will see all the images you have tagged. You can click on any of them to edit the tags if needed. But if you are happy with your tags, its time to train your model!

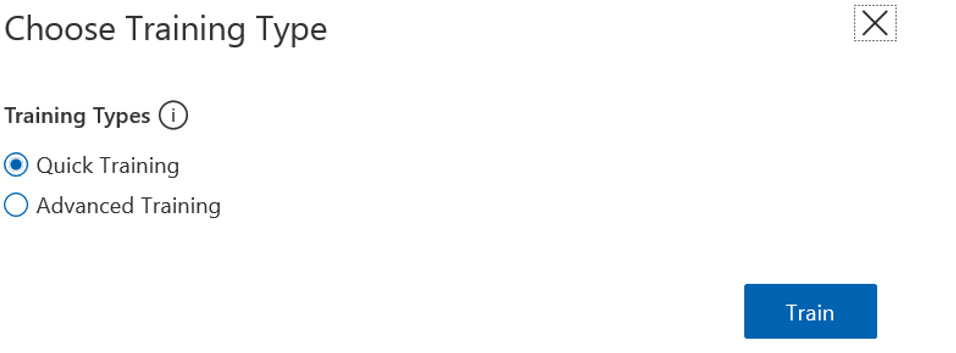
Hit the ‘Train’ button and select ‘quick training’ as your training type. Hit the ‘Train’ button to then kick off the training process. This will take around 5 minutes to complete, depending on how many images you have tagged.
Step 6: Test the model
When training completes, your screen will look something like this:
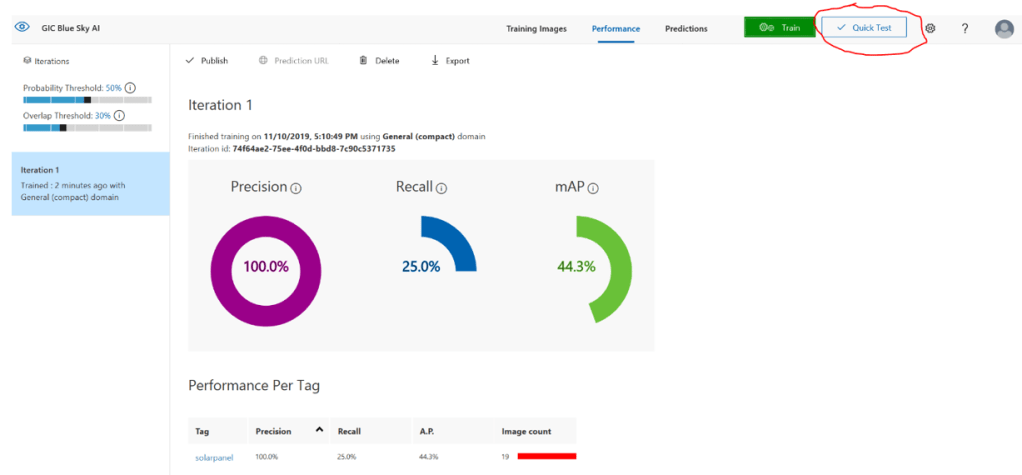
Its time to test your model! The easiest way to do so is with the ‘quick test’ button as highlighted above. Using one of the techniques used in step 2 to gather your images, go and grab a couple more and save them to the same folder. Grab some images of rooftops with solar panels of course, but also save a few that don’t have panels on the roof.
Hit the ‘Quick test’ link, and browse to select one of your new images.

As you can see here, the new model identified the correct location of the solar panels with a 71% confidence. Adding more images and running the training again will improve this. and you can go back to step 4 and do this anytime.
very cool! you just taught a machine how to identify solar panels on a roof. You can not only tag more solar panels, but you can add new tags for other entities you want to recognize in aerial imagery… Pools, trampolines, tennis courts…
In Part 2 of this tutorial series, we’ll use the same technique to operate on our disaster response imagery to identify differing levels of damage after wind events. I’ll add a link here as soon as Part 2 is online.
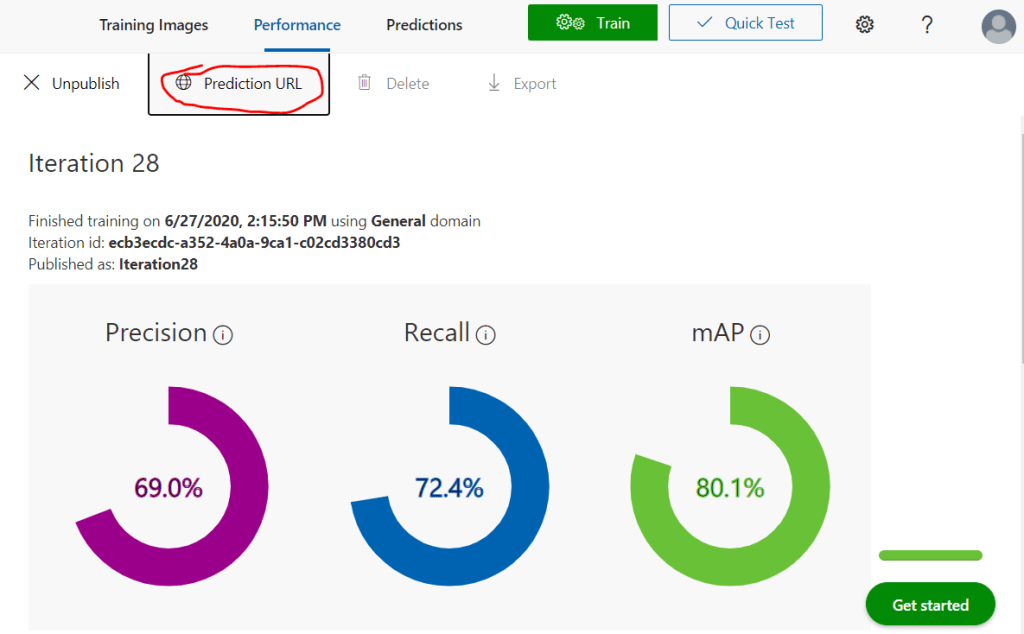
In Part 3, we’ll start to access the model’s we trained using the REST Api. But if you’d like to get a headstart on that and try the API out, here is a good tutorial on the custom vision website. You’ll find all of the access details you need to integrate in your app on the ‘Prediction URL’ dialog on the performance tab:

Wow…. that’s pretty amazing. To think of how long this would have taken and how much compute and toiling would have been required to develop feature recognition tools like this in the not-too-distant-past. Very cool.
LikeLiked by 1 person